Photogrammetry Rig for 3D Scanning: A Complete Guide
A photogrammetry rig refers to a setup of camera and lighting equipment. These setups allow for the capture of a large number of photos of an object or subject from various perspectives. The aim is to calculate photorealistic 3D models of the depicted objects. (If you want to learn more about how photogrammetry respectively 3D scanning works, we recommend this article.)
For photogrammetry to deliver good results, it relies on a broad data base. The more images from more perspectives, the better. It is essential that the object does not move or deform during the capture process, as each deviation results in fragments, holes or distortions in the final 3D model.
Practical Implementation of Photogrammetry Rigs
Theoretically, scanning an object requires just a single camera. It is important to capture the object from top to bottom from all possible perspectives. To do this, move continuously around the object and take pictures from all different angles. This approach requires a lot of practice and time. Thus, it makes sense to simplify the capture process and ensure more consistent results. For clarification: Even though you need photos with 360° coverage for photogrammetry, this is not 360° photography!
What Makes a Good Photogrammetry Rig?
Before diving into specific configurations, it helps to understand what separates a mediocre rig from a great one. Three factors are critical: coverage, consistency, and control.
Coverage means capturing the subject from every angle (top, bottom, and all sides) without leaving gaps. Any blind spot will produce holes or artifacts in the final mesh.
Consistency refers to keeping lighting, focus and exposure identical across every frame. Even small variations in light direction or intensity can confuse the reconstruction algorithm, leading to noise in the surface geometry.
Control is about minimising variables. A well-designed rig isolates the subject from ambient light, stabilises cameras to prevent motion blur, and synchronises triggers so nothing shifts between shots. This is especially critical when working with body scanning technology, where even a slight breath can introduce misalignment.
These three pillars apply whether you are scanning a small mechanical component with a 3D scanner for small objects or capturing a full human figure in a 3D scan booth.
Setup for Objects
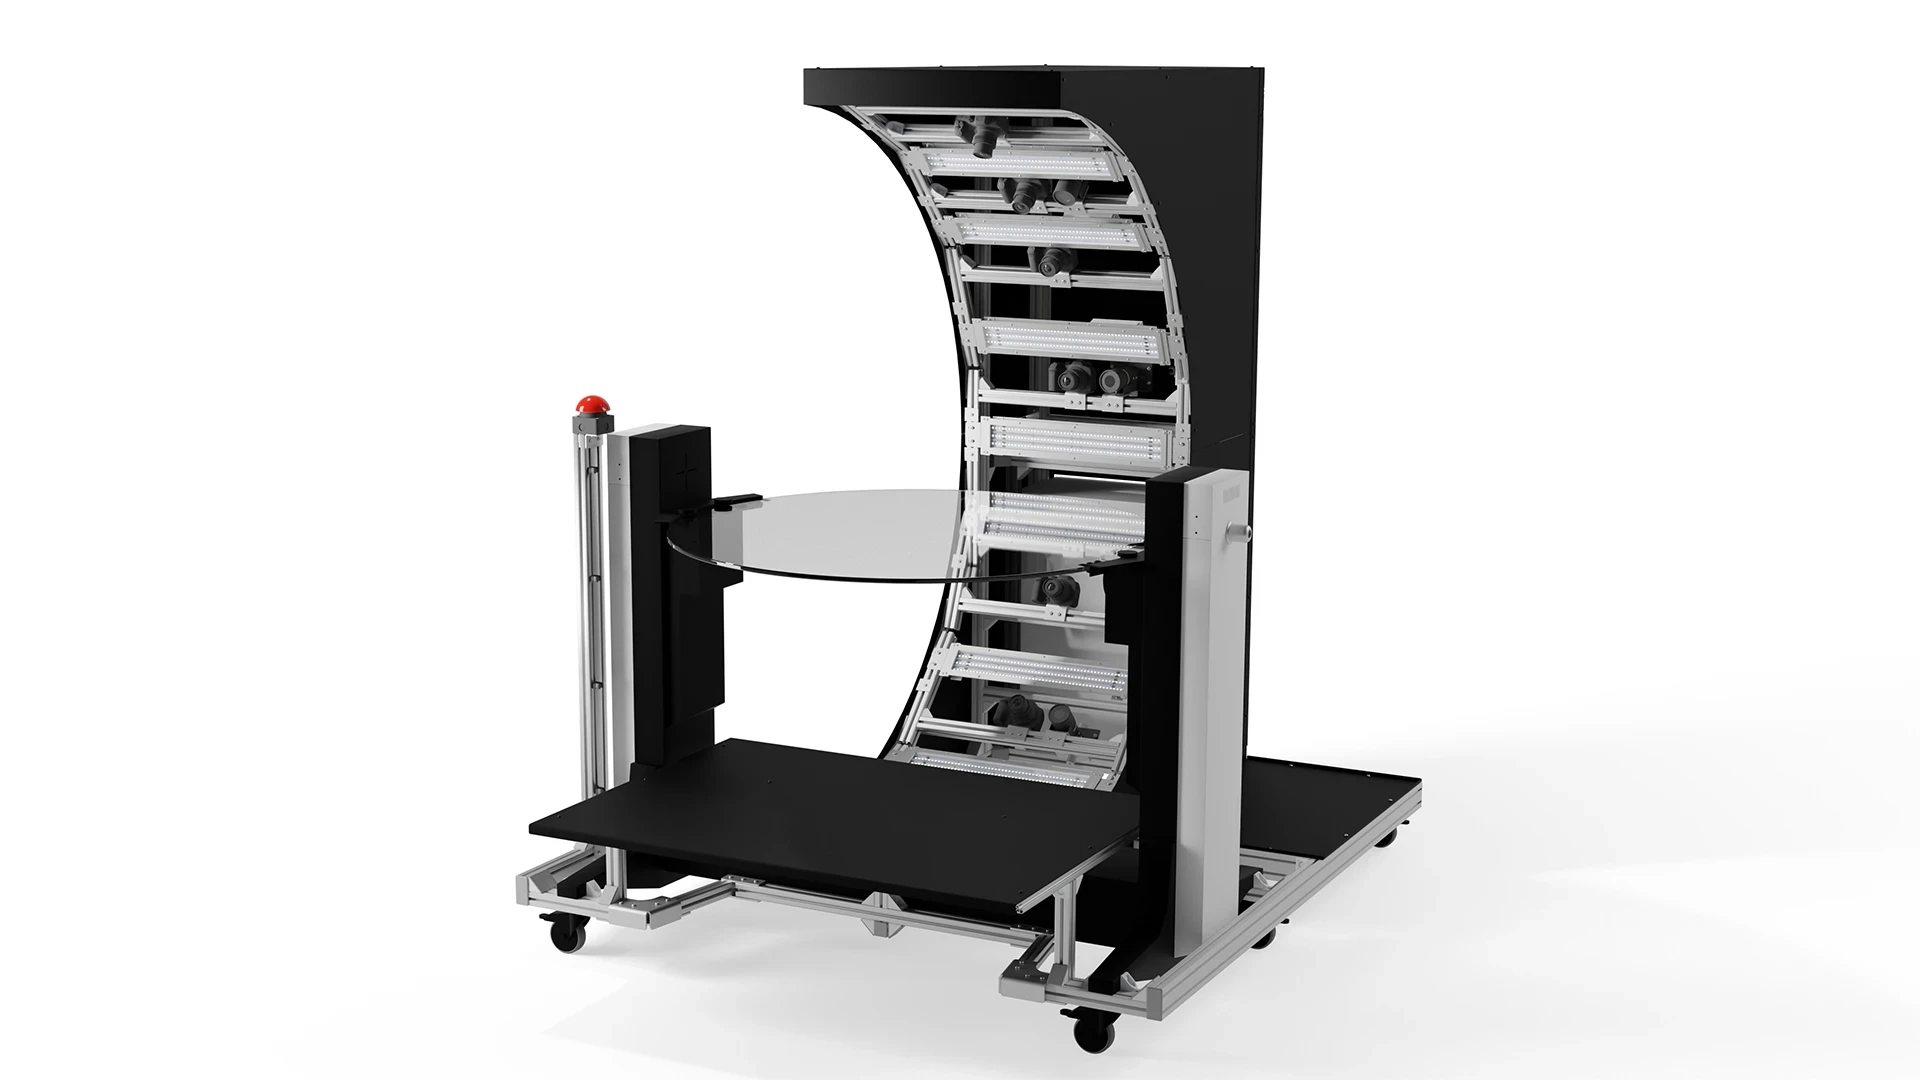
For objects, a basic setup requires a turntable and a camera on a tripod. Complete the system by adding a neutral background in white or black and a lighting system. The goal is to evenly illuminate the object and to make the background invisible.
Use 36 rotational steps of 10° each in order to cover all angles. We know that manually rotating, stopping, and triggering the camera(s) takes a lot of time. Especially as you have to repeat the process until you've completed a full 360°. So better use an automated setup with a programmable rotation motor and synchronized trigger mechanism.
To speed up the process, ideally use a camera arm with seven to nine cameras. Arrange the cameras in a half circle from a bird's-eye to worm's-eye view. Like this you are able to capture all images on one axis at each rotational step at once, eliminating the need for multiple passes.
With this, we've defined a common form of a photogrammetry setup. Our 3D Object Scanners (see image below) follow exactly this pattern.
A typical photogrammetry rig for 3D scanning objects usually consists of:
A turntable with a programmable step motor to place object on.
A camera arm with one or more cameras (ideally 7 to 9 cameras) arranged in a semicircle.
Diffuse light panels for even illumination.
A neutral background in black or white.
A control system for synchronizing and triggering the cameras after each step.
A computer for data processing.
Lighting for Object Scanning
Lighting requirements for a 3D object scanner are more flexible than many people assume. Simple LED strips work well in many setups, and some configurations use studio flashes successfully. The main goal is consistent, repeatable illumination across every frame so the reconstruction software sees a stable scene at each rotational step.
The more significant challenge is surface appearance rather than lighting type. Reflective or shiny objects are notoriously difficult to scan because photogrammetry relies on visible surface texture to match features between images. A uniform smooth or glossy surface gives the algorithm very little to work with. Matte objects with natural texture or colour variation, on the other hand, tend to scan cleanly with almost any lighting setup.
To address this, we developed Digital Spray technology: a pattern projection system that casts a visually complex, high-contrast pattern onto the surface of the object. The scanner captures two shots at each rotational step, one with the pattern projected and one without. The patterned image provides the rich feature information needed for accurate reconstruction, while the clean image without the pattern is used for the final texture. This approach makes it possible to scan highly reflective, transparent, or uniformly coloured objects that would otherwise be impossible to capture reliably with a standard 3D object scanner setup.
Choosing the Right Camera Type, Lenses and Count
A single camera on a rotating arm will do the job, but every additional camera reduces total capture time and increases data redundancy, both of which improve final model quality. Our 3D scanner for small objects uses five cameras arranged across the arc. Combined with 36 rotational steps, this produces 180 images per scan, which is sufficient for high-detail results on small components.
When it comes to camera brand, the choice is largely open. Sony, Canon, Nikon and other manufacturers all produce cameras that work well in a photogrammetry rig. What matters most is consistency: all cameras on the rig should ideally be the same model, so that sensor characteristics, colour response and exposure behaviour are identical across every frame.
Lens selection is where the decisions become more nuanced. Standard kit lenses work, but higher-quality lenses help reduce problems like lens distortion and chromatic aberration, both of which can introduce subtle inaccuracies into the final mesh. The trade-off is cost: fitting every camera on a large rig with a premium lens adds up quickly, so the choice depends on the required output quality and budget.
That said, it is not always necessary to use identical lenses on every camera. A good example is our NEO Full-Body Scanner, which offers a face package, typically used for film industry customers. In this configuration, some of the cameras pointing towards the face are fitted with 50mm lenses to capture higher-definition facial texture, while the remaining cameras use standard lenses for the rest of the body. For scanning very small or highly detailed objects, macro lenses can be swapped in to extract even more surface information from tiny components.
All of our photogrammetry rigs are fully customisable to the customer's use case. Cameras and lenses can be changed depending on what is needed, so whether you are scanning fashion accessories, industrial parts or human subjects for the film industry, the rig can be configured accordingly.
Setup for People and Animals
While this type of setup works for most objects, you need a different approach for scanning people or animals. This is because even micro-movements like blinking or breathing can cause problems in the calculations. In a sequential capture system, where images are taken one or a few at a time, these movements accumulate into misalignments that are very difficult to correct in post-processing.
The goal, therefore, is to capture all images simultaneously, which requires a large number of cameras. Over the years, we've experimented with setups ranging from 40 to 200 cameras. In our experience, 160 cameras deliver the best results.
Photogrammetry rigs for people, also known as full-body scanners, typically consist of multiple layers of cameras arranged in rings. The cameras are mounted on tripods, trusses, or other support systems. You also need lights, lots of cables, and two or more high-performance computers to collect and process the images.
Use Case: Full-Body Scanner
For our NEO Full-Body Scanner (see image below), we designed a setup with 12 side elements (so-called "poles"). Two of these poles are movable to function as doors. In addition, our custom built side elements offer essential advantages over traditional setups using ITEM, trusses or telescopic poles:
It creates a controllable lighting environment without stray light or other external influences, at the same time helping organize all the cables, plugs and connections. This significantly speeds up the setting-up and dismantling of the entire system. Instead of reconnecting each camera and cable, we merely connect the poles to each other. This also speeds up the system calibration.
A typical photogrammetry rig for 3D scanning people (a.k.a. full-body scans) usually consists of:
A circular or spherical framework to hold the camera and lighting equipment in pace.
40 – 200 cameras.
A variable number of studio flash units.
A neutral background in black or white.
A control system to synchronize and trigger the cameras and flashes.
Several high-performance computers for collecting and processing the data.

Applications of Full-Body and Object Scanning
The downstream uses of photogrammetry data are increasingly diverse. In e-commerce, 3D body scanner data feeds into virtual try-on systems, enabling accurate fit recommendations without the customer being present. In heritage preservation, 3D object scanner rigs document artefacts with archival-quality fidelity. In film and games, body scanning technology delivers photorealistic digital doubles in a fraction of the time required for traditional hand-sculpted models. Medical and orthotics applications rely on accurate body surface scans for custom prosthetics and orthopaedic devices.
For a deeper look at specific industry use cases, see our articles on 3D scanning in fashion, digitizing museum collections and 3D scanning for forensics.
Summary of Photogrammetry Rigs
As we have described in this article, photogrammetry rigs usually come in two basic forms:
A turntable with fewer cameras for 3D scanning objects, or
a round or spherical framework with many cameras for 3D scanning people (a.k.a. full-body scans) or animals.
There are always variations to these basic setups, as people and companies keep on building and innovating, such as a camera on a robotic arm or other CNC-controlled machines. These special builds are typically used in specific industrial applications or research purposes. As the field keeps growing, we are always excited to see new inventions and systems being created to achieve better and better results. Please let us know if you ever have a new idea in mind!
Frequently Asked Questions
How many cameras do I need for a full-body scanner?
It depends on your quality requirements and subject type. For static objects, a single camera on a motorised turntable is technically sufficient, though it is time-consuming. In practice, five to nine cameras strike a good balance, providing enough angular coverage without generating unnecessary data redundancy. For people and animals, simultaneous capture is essential. In our experience, 160 cameras provides the best balance of coverage, resolution and processing efficiency for 3D body scanner applications. That said, if surface texture is not a priority, 44 cameras can be enough to produce a high-quality geometric mesh.
What is the difference between a photogrammetry rig and a structured light scanner?
Photogrammetry derives 3D geometry from overlapping photographs using feature-matching algorithms. Structured light scanning projects a known pattern onto the subject and analyses its deformation. Both are legitimate approaches to body scanning technology, but photogrammetry scales better for full-body capture and produces more photorealistic colour texture data.
Can I scan transparent or shiny objects?
Standard photogrammetry struggles with surfaces that lack visible texture, such as glossy, mirror-like or transparent materials, because the feature-matching algorithm has too little information to work with. One traditional workaround is coating the object with a temporary matte spray before scanning, which is, as of now, still the only solution for fully transparent objects. However, for reflective or glossy surfaces, a more advanced solution is our Digital Spray technology, which projects a high-contrast pattern onto the surface and captures two frames at each rotational step. This removes the need for any physical coating and opens up a wider range of materials for reliable scanning with a 3D object scanner.
How long does a photogrammetry scan take?
With a fully automated 3D object scanner, a complete 36-step turntable scan takes under two minutes. Processing time varies with computer hardware and desired resolution, but modern GPU-accelerated pipelines typically deliver a finished mesh within 5–15 minutes. For full-body scanner systems, the actual capture is instantaneous; post-processing for a 160-camera dataset typically runs 10–30 minutes depending on resolution settings.


Industries Where Millimeters Matter: Why These Sectors Rely on High-Accuracy 3D Body Scanning

5 Things Cheap 3D Body Scanners Can't Do (That Professional Ones Can)

Augmented Ubiquity: The First 4D Gaussian Splat Captured with a botspot Scanner

360° Photography with the Momentum 2.0

botspot’s Automation Suite: Complete Control Over Your 3D Scanning Workflow